Are you tired of dealing with drafts, leaks, and energy inefficiency in your home? Look no further than professional caulking services to transform your living space. Caulking is a simple yet highly effective solution that can make a significant difference in your home’s comfort and energy costs.
In our ultimate guide to caulking, we’ll walk you through everything you need to know about this essential home improvement technique. From understanding the different types of caulk to mastering the application process, we’ll equip you with the knowledge and skills to tackle caulking projects like a pro.
At Dr. Silicone, our experienced team of caulking experts will share their insider tips and tricks, helping you achieve flawless results that will enhance both the aesthetics and functionality of your home. Whether you’re sealing gaps around windows and doors or waterproofing your bathroom, our guide covers it all.
Say goodbye to drafts and dampness with our comprehensive guide to caulking. Start transforming your home today with professional caulking services.

Understanding Caulk and its Importance in Home Maintenance
Caulk is a flexible material used to seal gaps and cracks in various areas of your home. It is typically made of silicone, latex, or acrylic compounds and comes in different colours to match your home’s decor. Caulk plays a crucial role in preventing air leakage, water infiltration, and energy loss.
One of the main benefits of using caulk is its ability to create an airtight and watertight seal. By sealing gaps around windows, doors, and other openings, caulk prevents drafts, moisture, and pests from entering your home. This not only improves your home’s comfort but also helps reduce energy consumption and lower utility bills.
Caulk is also essential for maintaining the structural integrity of your home. It prevents water from seeping into cracks and causing damage to the underlying materials. By sealing gaps and cracks, caulk helps prevent rot, mold, and other moisture-related issues that can weaken your home’s structure over time.
In addition to its practical benefits, caulk also enhances the aesthetics of your home. It provides a seamless finish by filling in gaps and creating a smooth surface. With the right caulk color and application technique, you can achieve a professional-looking result that adds value to your home.
To ensure your home is well-maintained and energy-efficient, regular caulking is essential. In the following sections, we’ll delve into the signs that indicate your home needs caulking and explore the different types of caulk available for various applications.
Benefits of Professional Caulking Services
While DIY caulking may seem like a viable option, there are several benefits to hiring professional caulking services. Professional caulking contractors have the experience, knowledge, and tools to deliver high-quality results that stand the test of time.
One of the main advantages of hiring professionals is their expertise in identifying areas that require caulking. They have a trained eye for spotting gaps, cracks, and other potential issues that may go unnoticed by the untrained homeowner. By addressing these problem areas, professionals can prevent further damage and ensure long-lasting results.
Professional caulking services also save you time and effort. Caulking can be a time-consuming task, especially if you’re not familiar with the process. By hiring experts, you can focus on other priorities while they handle the caulking job efficiently and effectively.
Additionally, professional caulking contractors have access to high-quality materials that may not be readily available to homeowners. They know which caulk types and brands perform best in different situations, ensuring optimal results. This expertise extends to the application process, as professionals have mastered the techniques necessary for a flawless finish.
Investing in professional caulking services can also save you money in the long run. Properly sealed gaps and cracks help reduce energy wastage, resulting in lower utility bills. By preventing moisture intrusion, professional caulking can also prevent costly water damage and the need for extensive repairs.
When it comes to maintaining and improving your home, professional caulking services offer numerous benefits. From expert guidance to time and cost savings, hiring professionals ensures a hassle-free experience and long-lasting results.
Signs that your Home needs Caulking
Knowing when to caulk is just as important as knowing how to caulk. Certain signs indicate that your home may require caulking to address gaps, cracks, or other issues. By being aware of these signs, you can proactively maintain your home and prevent further damage.
One of the telltale signs that your home needs caulking is drafts or air leaks. If you notice a noticeable temperature difference near windows or doors, it indicates that there are gaps allowing air to enter or escape. Caulking these gaps will not only improve your home’s comfort but also enhance its energy efficiency.
Another sign to look out for is water infiltration or leaks. If you notice water stains on walls or ceilings, it may indicate that there are gaps or cracks allowing water to seep into your home. Caulking these areas will help prevent further water damage and potential mold growth.
In addition to drafts and water leaks, visual inspection can reveal other signs that your home needs caulking. Look for gaps or cracks around windows, doors, baseboards, and other areas where different materials meet. These gaps can occur over time due to natural wear and tear, settling of the house, or improper installation.
If you’re unsure whether caulking is necessary, it’s best to consult with a professional caulking contractor. They can assess your home’s condition and recommend the appropriate caulking solutions to address any issues.
In the next section, we’ll explore the different types of caulk available and their specific uses in various areas of your home.
Different types of Caulk and their Uses
Caulk comes in various types, each designed for specific applications and surfaces. Understanding the different types of caulk available will help you choose the right one for your specific needs.
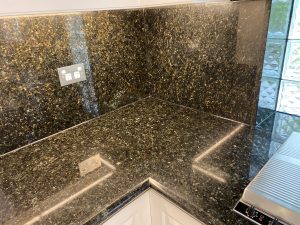
1. Silicone Caulk: Silicone caulk is highly versatile and suitable for both interior and exterior use. It is resistant to moisture, UV rays, and temperature fluctuations, making it an excellent choice for areas exposed to water or extreme weather conditions. Silicone caulk is commonly used in bathrooms, kitchens, and other wet areas.
2. Acrylic Caulk: Acrylic caulk is paintable and easy to work with, making it a popular choice for interior applications. It is water-based and dries quickly, allowing for easy cleanup. Acrylic caulk is ideal for sealing gaps around windows, doors, and baseboards.
3. Latex Caulk: Latex caulk is similar to acrylic caulk and is often used interchangeably. It is also paintable and offers good adhesion to a variety of surfaces. Latex caulk is suitable for both interior and exterior applications, making it a versatile option.
4. Polyurethane Caulk: Polyurethane caulk is known for its exceptional durability and flexibility. It is resistant to water, weather, and movement, making it suitable for both indoor and outdoor use. Polyurethane caulk is commonly used for sealing gaps in concrete, masonry, and other heavy-duty applications.
5. Butyl Rubber Caulk: Butyl rubber caulk is highly flexible and offers excellent adhesion. It is commonly used for sealing joints and gaps in roofing, gutters, and other exterior areas. Butyl rubber caulk provides a watertight seal and is resistant to UV rays and temperature extremes.
When choosing the right caulk for your project, consider the specific requirements of the area you’re caulking. Factors such as exposure to moisture, temperature fluctuations, and movement will influence the type of caulk you should use. Consulting with a professional caulking contractor can help ensure you select the most appropriate caulk for your needs.
In the next section, we’ll discuss the preparation and tools needed for a successful caulking project.
Preparation and Tools needed for Caulking
Are you tired of dealing with drafts, leaks, and energy inefficiency in your home? Look no further than Dr Silicone’s professional caulking services to transform your living space. Caulking is a simple yet highly effective solution that can make a significant difference in your home’s comfort and energy costs.
In our ultimate guide to caulking, we’ll walk you through everything you need to know about this essential home improvement technique. From understanding the different types of caulk to mastering the application process, we’ll equip you with the knowledge and skills to tackle caulking projects like a pro.
Our experienced team of caulking experts will share their insider tips and tricks, helping you achieve flawless results that will enhance both the aesthetics and functionality of your home. Whether you’re sealing gaps around windows and doors or waterproofing your bathroom, our guide covers it all.
Say goodbye to drafts and dampness with our comprehensive guide to caulking. Start transforming your home today with professional caulking services.
Step-by-step guide to Caulking Different Areas of your Home
Caulk comes in various types, each designed for specific purposes. Understanding the differences between them will help you choose the right caulk for your project.
1. Silicone Caulk: Silicone caulk is highly flexible and resistant to moisture, making it ideal for areas exposed to water, such as bathrooms and kitchens. It adheres well to non-porous surfaces like glass and tile, creating a durable and waterproof seal.
2. Acrylic Latex Caulk: Acrylic latex caulk is a versatile option suitable for most interior caulking needs. It’s easy to apply, dries quickly, and can be painted over, making it perfect for sealing gaps around windows, doors, and baseboards.
3. Polyurethane Caulk: Polyurethane caulk is known for its excellent adhesion and durability. It’s commonly used for outdoor projects, such as sealing gaps in siding, trim, and concrete. Polyurethane caulk can withstand extreme weather conditions and provides superior resistance against moisture and UV rays.
Common Mistakes to Avoid When Caulking
Before you start caulking, proper preparation and having the right tools are essential for achieving professional results. Here’s what you’ll need:
1. Safety Precautions: Begin by ensuring proper ventilation in the area you’ll be working in. Open windows or use fans to remove fumes. Wear protective gloves and safety goggles to prevent skin irritation and eye injuries.
2. Cleaning and Surface Preparation: Clean the surfaces you’ll be caulking thoroughly. Remove any old caulk, dirt, or debris using a caulk remover, putty knife, or wire brush. Ensure the surface is dry before applying new caulk.
3. Caulking Gun: A caulking gun is an essential tool for applying caulk smoothly and evenly. Choose a high-quality caulking gun with a comfortable grip for ease of use.
4. Caulk: Select the appropriate type of caulk for your project, as discussed earlier. Consider the color and finish that best matches your surroundings for a seamless look.
5. Caulking Tool: A caulking tool helps you achieve a professional finish by smoothing the caulk and removing excess. It can be a simple plastic tool or a more advanced one with different edges for different purposes.
6. Masking Tape: Masking tape can be useful for creating clean, straight lines and preventing caulk from spreading where it’s not needed.
7. Wet Cloth or Sponge: Keep a wet cloth or sponge nearby to wipe away any excess caulk or to clean up mistakes.
Maintaining and Prolonging the Lifespan of your Caulk
Now that you have your tools ready, let’s dive into the step-by-step process of caulking different areas of your home. Whether you’re sealing gaps around windows, doors, or in the bathroom, these techniques will help you achieve professional-looking results.
Caulking Windows and Doors
1. Prepare the Surface: Clean the area around the window or door frame, removing any old caulk or debris. Ensure the surface is dry before proceeding.
2. Masking Tape: If desired, apply masking tape along the edges of the frame to create clean lines and prevent caulk from spreading onto the surrounding surfaces.
3. Load the Caulking Gun: Insert the tube of caulk into the caulking gun, ensuring it’s securely in place. Cut the tip of the caulk tube at a 45-degree angle, creating a small opening.
4. Apply Caulk: Hold the caulking gun at a 45-degree angle and apply a steady, even bead of caulk along the gap or joint. Move the gun smoothly and consistently, applying the caulk without stopping.
5. Smooth and Shape: Immediately after applying the caulk, use a caulking tool or your finger (with a glove) to smooth and shape the caulk. Remove any excess caulk, ensuring a neat and professional finish.
6. Remove Masking Tape: If you used masking tape, carefully remove it while the caulk is still wet. This will prevent the caulk from sticking to the tape and creating an uneven line.
Caulking the Bathroom
1. Clean and Dry the Area: Before caulking the bathroom, ensure the surfaces are clean and dry. Remove any old caulk or mildew using a caulk remover or bleach solution.
2. Apply Masking Tape: Apply masking tape along the edges of the bathtub, sink, or shower to create clean lines and protect the surrounding surfaces.
3. Load the Caulking Gun: Insert the tube of caulk into the caulking gun, cutting the tip at a 45-degree angle.
4. Apply Caulk: Starting at one end, apply a continuous bead of caulk along the joint or gap. Move the caulking gun steadily, maintaining an even flow of caulk.
5. Smooth and Shape: Use a caulking tool or your finger (with a glove) to smooth and shape the caulk immediately after applying it. Remove any excess caulk to create a clean and polished finish.
6. Remove Masking Tape: Carefully remove the masking tape while the caulk is still wet to achieve crisp lines and prevent smudging.
Hiring Professional Caulking Services vs. DIY Caulking
While caulking is a relatively simple process, there are common mistakes that can lead to subpar results. By avoiding these errors, you can ensure a professional finish and maximize the effectiveness of your caulk.
1. Not Cleaning the Surface: Failing to clean the surface properly before caulking can prevent the caulk from adhering properly. Always remove old caulk, dirt, and debris before applying new caulk.
2. Using the Wrong Type of Caulk: Choosing the wrong type of caulk for your project can result in poor adhesion, cracking, or premature deterioration. Make sure to use the appropriate caulk for the specific area you’re caulking.
3. Overfilling Gaps: Overfilling gaps with caulk can create an unsightly appearance and waste caulk. Apply a thin, even bead of caulk, ensuring it fills the gap without excess.
4. Not Smoothing the Caulk: Neglecting to smooth the caulk can leave it uneven and unprofessional-looking. Use a caulking tool or your finger to smooth and shape the caulk immediately after applying it.
5. Not Removing Excess Caulk: Leaving excess caulk on the surface can attract dirt and debris, compromising the integrity of the seal. Remove any excess caulk using a wet cloth or sponge.
Transforming your Home with Professional Caulking Services
Proper maintenance will help prolong the lifespan of your caulk, ensuring its effectiveness and preventing the need for frequent reapplications. Here are some tips for maintaining your caulk:
1. Regular Cleaning: Clean the caulked areas regularly to remove dirt, grime, and mildew. Use a mild detergent and a soft cloth or sponge.
2. Inspect for Damage: Periodically inspect the caulk for signs of cracking, peeling, or deterioration. Promptly repair any damaged areas to maintain a watertight seal.
3. Avoid Harsh Cleaners: Harsh cleaning products can degrade caulk over time. Use mild cleaners and avoid abrasive tools or chemicals that can damage the caulk.
4. Maintain Proper Ventilation: Adequate ventilation in areas prone to moisture, such as bathrooms and kitchens, can help prevent mould and mildew growth, reducing the strain on the caulk.
5. Address Water Leaks: If you notice water leaks or excessive moisture around caulking areas, investigate and address the underlying issue promptly. Water damage can compromise the integrity of the caulk.